# $watch 的原理
《变化监测》中提到了 Watcher,展示了它作为依赖的作用是:
- 触发数据的
getter,并作为依赖被收集 - 数据变化时,会被通知更新
这篇文章,通过分析 $watch() 方法,进一步了解 Watcher。
$watch() 方法被定义在 Vue.prototype 上,所以所有 Vue 的实例对象,都拥有该方法。
之后在《组件挂载》章节会分析,组件的构造函数是通过 Vue.extend() “继承”自 Vue 的,所以所有组件都拥有该方法。
对于 $watch() 可能用的不多,但是 watch 一定是很熟悉的,实际上 $watch() 是 watch 的底层 API。
示例:
const vm = new Vue({
  data() {
    return {
      fullname: {
        firstname: 'nail'
      }
    }
  }
})

vm.$watch('fullname.firstname', function (newVal, oldVal) {
  // 做点什么
})
这里有几个值得注意的点:
vm.fullname和vm.fullname.firstname都是响应式数据- 通过
vm.$watch()监听了vm.fullname.firstname的变化,一旦变化就会触发回调 - 第 2 点同时也说明
vm.$watch()内部一定创建了Watcher实例,并被vm.fullname.firstname作为依赖收集了。否则vm.fullname.firstname变化时不会触发回调
# Watcher 是监听器
假设 $watch() 内部只有如下代码:
Vue.prototype.$watch = function(path, cb) {
  const vm = this
  new Watcher(vm, path, cb)
}
《变化监测》后,我们得到的 Watcher 是这样的:
class Watcher {
  constructor(obj, key) {
    this.getter = () => obj.key
  }

  get() {
    target = this
    // 执行后触发 getter
    const value = this.getter()
    target = undefined
    return value
  }

  update() {
    // 更新视图
  }
}
现在我们需要注册回调,将代码更新为:
let target

class Watcher {
  constructor(vm, key, cb) {
    // 更新代码
    this.obj = vm
    // 待支持属性路径
    this.getter = () => obj.key
    this.cb = cb
    this.value = this.get()
  }

  get() {
    target = this
    // 执行后触发 getter
    const value = this.getter()
    target = undefined
    return value
  }

  // 更新代码
  update() {
    const value = this.get()
    const oldValue = this.value
    if (value !== oldValue) {
      this.value = value
      this.cb.call(this.obj, value, oldValue)
    }
  }
}
# 属性路径
上面的代码中,属性路径的解析还待支持,为了把重点放在讲解 $watch() 本身,就不具体将属性路径的解析了(当然本身也够简单):
lodash 中有一个叫 get 的函数就做了这个事,举个例子:
const obj = {
  fullname: {
    firstname: 'nail'
  }
}

_.get(obj, 'fullname.firstname') // obj.fullname.firstname
把这个函数代入 Watcher:
class Watcher {
  constructor(vm, key, cb) {

    // 省略多余代码

    // 更新代码
    this.getter = () => _get(vm, key)
  }

  // 省略多余代码
}
你可能会觉得到这里就分析完了,但其实还没有...
# 触发函数
官方示例中,第一个参数还可以是一个函数:
// 函数
vm.$watch(
  function () {
    return this.a + this.b
  },
  function (newVal, oldVal) {
    // 做点什么
  }
)
属性路径被替换为了一个函数,函数内部同样会触发响应式数据的 getter。但是仔细看看,这个函数很有意思:
- 该函数会触发多个响应式数据的
getter(如果只需要触发一个数据的getter,那用「属性路径」方式就够了) - 第 1 点也就意味着,这个
Watcher实例会被多个响应式数据作为依赖而收集
继续修改 Watcher:
class Watcher {
  constructor(vm, keyOrFn, cb) {
    this.obj = vm
    this.cb = cb

    // 更新代码
    if (typeof keyOrFn === 'function') {
      this.getter = keyOrFn.bind(vm)
    } else {
      this.getter = () => _.get(vm, keyOrFn)
    }

    this.value = this.get()
  }

  // 省略多余代码...
}
# 取消监听 - 监听器的自我修养
$watch() 返回一个取消监听函数,通过该函数停止触发回:
// 省略多余代码...

// 新增代码
const unwatch = vm.$watch(/* 省略多余代码 */)

// 取消监听
unwatch()
取消监听的本质是响应式数据把当前 watcher 从依赖列表中移除。
既然如此,我们就需要去寻找当前值的依赖列表,这有些麻烦了;另外前面提过,同一个 Watcher 可能被多个依赖列表收集,这就更麻烦了,我们无法主动知道触发函数中使用了哪些响应式数据,我们只能通过响应式数据知道它收集的依赖。
# 互相保存引用
为了达到这一目的,我们需要在依赖收集时,将依赖容器保存在 watcher 中,这么一来:
Watcher中维护了使用该watcher实例的Dep对象Dep中维护了当前响应式数据的依赖
修改 Watcher 的代码:
class Watcher {
  constructor() {
    // 省略多余代码...

    // 新增代码
    this.deps = []
  }

  // 新增代码
  addDep(dep) {
    if (this.deps.indexOf(dep) === -1) {
      this.deps.push(dep)
    }
  }

  // 省略多余代码...
}
修改依赖收集时 Dep 的代码:
class Dep {
  constructor() {
    this.subs = []
  }

  addSub(sub) {
    this.subs.push(sub)
  }

  notify() {
    const subs = this.subs
    for (let i = 0; i < subs.length; i++) {
      subs[i].update()
    }
  }

  depend() {
    if (target) {
      if (this.subs.indexOf(target) === -1) {
        this.addSub(target)
      }

      // 新增代码
      target.addDep(this)
    }
  }
}
接下来要实现取消监听就容易多了,给 Watcher 添加一个取消监听的方法:
class Watcher {
  // 省略多余代码

  // 新增代码
  teardown() {
    const watcher = this
    this.deps.forEach(dep => {
      const index = dep.subs.indexOf(watcher)
      dep.subs.splice(index, 1)
    })
  }
}
对应的 Vue.prototype.$watch() 就更新为:
Vue.prototype.$watch = function(path, cb) {
  const vm = this
  // 更新代码
  const watcher = new Watcher(vm, path, cb)

  return function unwatch() {
    watcher.teardown()
  }
}
# 选项
# immediate
immediate: true 表示立即以当前值触发回调,简单修改 Vue.prototype.$watch 即可:
Vue.prototype.$watch = function(path, cb, options) {
  const vm = this
  const watcher = new Watcher(vm, path, cb)

  // 更新代码
  if (options.immediate) {
    watcher.cb.call(vm, watcher.value)
  }

  return function unwatch() {
    watcher.teardown()
  }
}
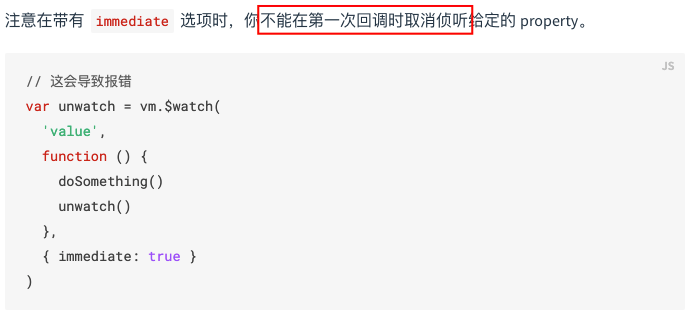
如图所示,官方文档提醒:
不能在第一次回调时取消监听

代码中可以看出,是因为在返回 unwatch() 函数前,回调函数就已经执行了。
# deep
deep: true 表示对一个对象进行深度的检测,即对象内部的值的变化,也会触发回调。
这其实很容易做到,因为对象的所有值都是响应式数据,所以只需要将该 Watcher 添加到这些值的依赖列表即可。
所以修改 Watcher 代码:
class Watcher {
  constructor(obj, key, cb, deep) {
    // 省略多余代码

    // 新增代码
    this.deep = deep
  }

  // 更新代码
  get() {
    target = this
    // 执行后触发 getter
    const value = this.getter()

    if (this.deep) {
      // 遍历所有 key,并触发 getter
      traverse(value)
    }

    target = undefined

    return value
  }
}

function traverse(val) {
  const keys = Object.keys(val)
  let len = keys.length

  if (typeof val !== 'object') return

  while (len--) {
    traverse(val[keys[i]])
  }
}
← 变化监测 data & props →